How to Use The Wix Editor: A Step By Step Guide
To make things simpler, we’ve broken down the Wix Editor process into 12 steps:
1. Sign up
2. Choose a template
3. Update text and images
4. Personalize the background
5. Add pages/site navigation
6. Add apps
7. Set up a blog
8. Add an online store
9. Optimize for search engines
10. Make it look good on mobile
12. Choose a domain name
13. Publish
If you’ve compared the top website builders out there and come to the conclusion that Wix is for you, then a lot of your work is already done. But there’s still one more decision to make before Wix does the rest of the heavy lifting: you need to pick a pricing plan.
Wix offers eight pricing plans, so there are a few different places you can start. As with all subscriptions, the more you pay, the more features you get. You can also choose a free plan, but you’ll have to sacrifice a professional domain name and deal with on-site ads, which give websites a more amateur look.
We recommend the Premium plans – they’re affordable, and open up more business opportunities.
The Wix Premium plans are:
Combo plan: $17/month ($13/month paid yearly)
Unlimited plan: $22/month ($17/month paid yearly)
Pro plan: $27/month ($22/month paid yearly)
VIP plan: $47/month ($39/month paid yearly)
Business Basic plan: $28/month ($23/month paid yearly)
Business Unlimited plan: $33/month ($27/month paid yearly)
Business VIP plan: $56/month ($49/month paid yearly)
Enterprise plan: $750/month ($500/month paid yearly)
We recommend the Combo plan for small businesses. It’s free from ads, comes with a personalized domain name for one year, and provides enough storage for most website needs. It’s also very reasonably priced.
If you’re starting an online store, the Business Unlimited option allows for – you guessed it – unlimited products. For larger online stores, though, the VIP plan is best because it offers first priority customer support.
To get started, select Create a New Site from the drop down menu in the top right corner of the dashboard. Once you click, Wix will ask what type of website you want. There are options for everyone, from online stores to personal portfolios.
Based on your selection, you’ll be taken to a page of relevant templates to choose from – and when it comes to Wix templates, you’re spoiled for choice. There are over 500 templates in total, so if your dream template isn’t in your selected category, you can always use the search bar to find more.
The one downside of all this choice is that once you choose your template, you can’t change it. You’ll therefore want to make sure you’re happy with the template you choose, but don’t worry – Wix’s flexible editing features make it easy to spice up whatever design you do choose at any time.
At this point, you’ll get to see a preview page of your chosen template. This is where you can play around with simple but brilliant editing features, like the drag-and-drop design and text boxes.
First, you’ll want to update your company, portfolio, or blog details. Simply click on the text you want to change, then rewrite – it’s that easy. You can also change the font size and color, and typeface favorites like italics and bold are also there for some extra font-based fun.
If your template comes with images, these can be changed too. This is what makes Wix the best – you can really make the website your own, one click at a time. Don’t like an image? Click it and switch it out for something you do like. It could be a saved photo from your business, or one of Wix’s free images – there are tons of design possibilities to be explored here.
Step 4: Personalize the Background
If small images aren’t enough, you can also change your template background. The left-hand sidebar features a ‘Background’ button, which you can use to click and change with ease.
We recommend adding a video to your background – they’ve become one of the most popular UX (User Experience) trends of 2019, and will generate more interest. In fact, 85% of the American internet audience watches videos online!
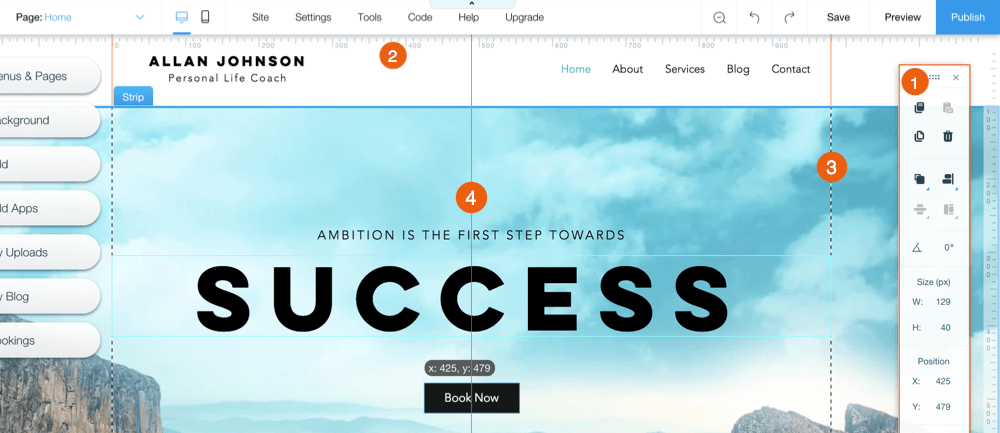
When you edit the background of your Wix site – or any other part, for that matter – you’ll have two toolbars to work with: one on the right-hand side of the screen, and one on the left-hand side.
The toolbar on the left is for adding extras to your site, such as backgrounds, more pages, images, or even apps (we’ll explain apps in step 7!).
Once you’ve included everything you want, you can use the right-hand toolbar to duplicate, rotate, or delete your various new additions.
You can also go rogue and stir your add-ons around with the drag-and-drop, using the dotted lines to help with symmetry (if that’s your style).
Once you’ve created a stunning homepage, there are a few other pages you should add to ensure your website has everything visitors are looking for. For example, make sure to include an “About” page and a “Contact Us” page.
To add a page to your site with Wix Editor, click the down arrow next to your current page at the top of the editor, then click “Manage Pages.”
From the resulting menu, you’ll be able to add pages and customize them to serve different purposes.
By this point, you’ve customized your site’s template and added some solid images and pages. But if your site still feels a little plain, there’s no need to worry – adding some exciting bells and whistles is a lot easier than it seems. Wix’s App Market has over 250 amazing applications to boost your site, and they cover everything from restaurant orders to interactive quizzes. The apps don’t just look great, either – they also provide your website with the modern interface necessary to stay competitive.
Take a virtual wander through the marketplace and pick out your favorites. Each app has a thumbnail preview, with a ‘Free’ or ‘Premium’ price option (or both). And best of all, unlike most markets, you won’t need to haggle for prices.
Keep your audience in the loop with a professional-looking blog page, fully integrated with your site. The new Wix Blog can be found by clicking the pen-shaped ‘Start Blogging’ button, which can be found at the bottom of the builder menu.
For a choice of blogging apps, search the ‘Add Apps’ button on the same menu. You have a choice of blog apps, but we recommend Wix Blog for its ease of use and sleek appearance.
The app itself is easily manageable, too. Click the same pen-shaped button, then ‘Add Blog Elements’ to throw in some handy features, such as an Instagram feed, events, or an RSS (Really Simple Syndication) button used for sharing content online.
If you’d like your site to function as an online store, then you’ve made a good choice using Wix. In fact, we’ve rated it as the best website builder for small businesses.
By clicking the “+” icon in the left-hand menu, you’ll be presented with a list of add-ons for your site.
From here, Wix will automatically set up ecommerce functions on your site for you, including product galleries, multiple payment methods, and inventory management.
Wix’s ecommerce functions allow you to sit back and start selling in the blink of an eye.
Wix Editor makes it straightforward to work with your site’s SEO (Search Engine Optimization) capabilities.
Here, you’re given control over all of your site’s basic SEO functions, from the keywords that you tag your page with to the site description that will show up on SERPs (Search Engine Results Pages) – all of which you can edit with ease.
Making sure the mobile version of your site looks great is vital to its success, since mobile is pretty much taking over the world – these days, 40% of people search only on a smartphone.
Thankfully, with Wix Editor, mobile optimization is as easy as it is important. To start, hover your mouse over the desktop screen at the top of the editor.
Then, click the mobile icon to see what your site will look like when viewed from a phone screen.
Odds are, Wix has taken care of mobile view for you, and your site already looks awesome in this format. But you can still make as many changes as you want – and any changes you make in mobile view will not affect the desktop version of your site.
Before you publish your Wix site, you’ll need to set your domain name (Wix will prompt you to do this when you click “Publish”).
If you’re using Wix’s free plan, then you won’t be able to use a regular domain name like “www.mysite.com” or “www.mysite.net” (domains like this come with Wix’s paid plans). Instead, your site will follow the format www.yourname.wixsite/yoursite, which is enough to get it up and running. But if you’re going for a more professional look, then we recommend upgrading to a paid plan to secure a more polished domain!
By now, your Wix Editor site will be ready to go. Throughout the Wix editing process, you can preview your masterpiece with the button in the top right corner. Once you’re satisfied, simply click ‘Publish’ next to Preview, and… it’s live!
You can always edit your Wix site after publishing, so don’t feel like it’s a permanent commitment to the changes you’ve made. Just open your site’s dashboard, click “Manage Site,” then “Edit Site,” and off you go. To re-publish, just click ‘Publish’ again in the top right corner.
There’s a reason why Wix is our highest rated website builder (see our comparison table). It’s easy, fun, and lets you take control. Follow these steps to end up with a website that you’re proud of – with none of the headache you may have anticipated.
1. Sign up
2. Choose a template
3. Update text and images
4. Personalize the background
5. Add pages/site navigation
6. Add apps
7. Set up a blog
8. Add an online store
9. Optimize for search engines
10. Make it look good on mobile
12. Choose a domain name
13. Publish
Step 1: Sign Up
If you’ve compared the top website builders out there and come to the conclusion that Wix is for you, then a lot of your work is already done. But there’s still one more decision to make before Wix does the rest of the heavy lifting: you need to pick a pricing plan.
Wix offers eight pricing plans, so there are a few different places you can start. As with all subscriptions, the more you pay, the more features you get. You can also choose a free plan, but you’ll have to sacrifice a professional domain name and deal with on-site ads, which give websites a more amateur look.
We recommend the Premium plans – they’re affordable, and open up more business opportunities.
The Wix Premium plans are:
Combo plan: $17/month ($13/month paid yearly)
Unlimited plan: $22/month ($17/month paid yearly)
Pro plan: $27/month ($22/month paid yearly)
VIP plan: $47/month ($39/month paid yearly)
Business Basic plan: $28/month ($23/month paid yearly)
Business Unlimited plan: $33/month ($27/month paid yearly)
Business VIP plan: $56/month ($49/month paid yearly)
Enterprise plan: $750/month ($500/month paid yearly)
We recommend the Combo plan for small businesses. It’s free from ads, comes with a personalized domain name for one year, and provides enough storage for most website needs. It’s also very reasonably priced.
If you’re starting an online store, the Business Unlimited option allows for – you guessed it – unlimited products. For larger online stores, though, the VIP plan is best because it offers first priority customer support.
Step 2: Choose a Template
To get started, select Create a New Site from the drop down menu in the top right corner of the dashboard. Once you click, Wix will ask what type of website you want. There are options for everyone, from online stores to personal portfolios.
Based on your selection, you’ll be taken to a page of relevant templates to choose from – and when it comes to Wix templates, you’re spoiled for choice. There are over 500 templates in total, so if your dream template isn’t in your selected category, you can always use the search bar to find more.
The one downside of all this choice is that once you choose your template, you can’t change it. You’ll therefore want to make sure you’re happy with the template you choose, but don’t worry – Wix’s flexible editing features make it easy to spice up whatever design you do choose at any time.
Step 3: Update Text and Images
At this point, you’ll get to see a preview page of your chosen template. This is where you can play around with simple but brilliant editing features, like the drag-and-drop design and text boxes.
First, you’ll want to update your company, portfolio, or blog details. Simply click on the text you want to change, then rewrite – it’s that easy. You can also change the font size and color, and typeface favorites like italics and bold are also there for some extra font-based fun.
If your template comes with images, these can be changed too. This is what makes Wix the best – you can really make the website your own, one click at a time. Don’t like an image? Click it and switch it out for something you do like. It could be a saved photo from your business, or one of Wix’s free images – there are tons of design possibilities to be explored here.
Step 4: Personalize the Background
If small images aren’t enough, you can also change your template background. The left-hand sidebar features a ‘Background’ button, which you can use to click and change with ease.
We recommend adding a video to your background – they’ve become one of the most popular UX (User Experience) trends of 2019, and will generate more interest. In fact, 85% of the American internet audience watches videos online!
When you edit the background of your Wix site – or any other part, for that matter – you’ll have two toolbars to work with: one on the right-hand side of the screen, and one on the left-hand side.
The toolbar on the left is for adding extras to your site, such as backgrounds, more pages, images, or even apps (we’ll explain apps in step 7!).
Once you’ve included everything you want, you can use the right-hand toolbar to duplicate, rotate, or delete your various new additions.
You can also go rogue and stir your add-ons around with the drag-and-drop, using the dotted lines to help with symmetry (if that’s your style).
Step 5: Add Pages
Once you’ve created a stunning homepage, there are a few other pages you should add to ensure your website has everything visitors are looking for. For example, make sure to include an “About” page and a “Contact Us” page.
To add a page to your site with Wix Editor, click the down arrow next to your current page at the top of the editor, then click “Manage Pages.”
From the resulting menu, you’ll be able to add pages and customize them to serve different purposes.
Step 6: Add Apps
By this point, you’ve customized your site’s template and added some solid images and pages. But if your site still feels a little plain, there’s no need to worry – adding some exciting bells and whistles is a lot easier than it seems. Wix’s App Market has over 250 amazing applications to boost your site, and they cover everything from restaurant orders to interactive quizzes. The apps don’t just look great, either – they also provide your website with the modern interface necessary to stay competitive.
Take a virtual wander through the marketplace and pick out your favorites. Each app has a thumbnail preview, with a ‘Free’ or ‘Premium’ price option (or both). And best of all, unlike most markets, you won’t need to haggle for prices.
Step 7: Set Up a Blog
Keep your audience in the loop with a professional-looking blog page, fully integrated with your site. The new Wix Blog can be found by clicking the pen-shaped ‘Start Blogging’ button, which can be found at the bottom of the builder menu.
For a choice of blogging apps, search the ‘Add Apps’ button on the same menu. You have a choice of blog apps, but we recommend Wix Blog for its ease of use and sleek appearance.
The app itself is easily manageable, too. Click the same pen-shaped button, then ‘Add Blog Elements’ to throw in some handy features, such as an Instagram feed, events, or an RSS (Really Simple Syndication) button used for sharing content online.
Step 8: Add an Online Store
If you’d like your site to function as an online store, then you’ve made a good choice using Wix. In fact, we’ve rated it as the best website builder for small businesses.
By clicking the “+” icon in the left-hand menu, you’ll be presented with a list of add-ons for your site.
From here, Wix will automatically set up ecommerce functions on your site for you, including product galleries, multiple payment methods, and inventory management.
Wix’s ecommerce functions allow you to sit back and start selling in the blink of an eye.
Step 9: Optimize for Search Engines
Wix Editor makes it straightforward to work with your site’s SEO (Search Engine Optimization) capabilities.
Here, you’re given control over all of your site’s basic SEO functions, from the keywords that you tag your page with to the site description that will show up on SERPs (Search Engine Results Pages) – all of which you can edit with ease.
Step 10: Make It Look Good on Mobile
Making sure the mobile version of your site looks great is vital to its success, since mobile is pretty much taking over the world – these days, 40% of people search only on a smartphone.
Thankfully, with Wix Editor, mobile optimization is as easy as it is important. To start, hover your mouse over the desktop screen at the top of the editor.
Then, click the mobile icon to see what your site will look like when viewed from a phone screen.
Odds are, Wix has taken care of mobile view for you, and your site already looks awesome in this format. But you can still make as many changes as you want – and any changes you make in mobile view will not affect the desktop version of your site.
Step 11: Choose a Domain Name
Before you publish your Wix site, you’ll need to set your domain name (Wix will prompt you to do this when you click “Publish”).
If you’re using Wix’s free plan, then you won’t be able to use a regular domain name like “www.mysite.com” or “www.mysite.net” (domains like this come with Wix’s paid plans). Instead, your site will follow the format www.yourname.wixsite/yoursite, which is enough to get it up and running. But if you’re going for a more professional look, then we recommend upgrading to a paid plan to secure a more polished domain!
Step 12: Publish!
By now, your Wix Editor site will be ready to go. Throughout the Wix editing process, you can preview your masterpiece with the button in the top right corner. Once you’re satisfied, simply click ‘Publish’ next to Preview, and… it’s live!
You can always edit your Wix site after publishing, so don’t feel like it’s a permanent commitment to the changes you’ve made. Just open your site’s dashboard, click “Manage Site,” then “Edit Site,” and off you go. To re-publish, just click ‘Publish’ again in the top right corner.
There’s a reason why Wix is our highest rated website builder (see our comparison table). It’s easy, fun, and lets you take control. Follow these steps to end up with a website that you’re proud of – with none of the headache you may have anticipated.